Note: Visualizations are not mobile friendly. I recommend a laptop or desktop for viewing this site.
Someone asked me today about what I thought higher education's biggest challenge was, and I said college costs without thinking. And a few hours later, I still think that, with a twist: College costs for low-income students, especially at public institutions who presumably have a primary mission of educating students of all income levels in their state.
To be sure, costs are too high at private institutions, and many of the trends you'll see here are carried over and amplified in the private sector; but private colleges and universities may exist for different reasons, and that can be hard to capture in a visualization like this.
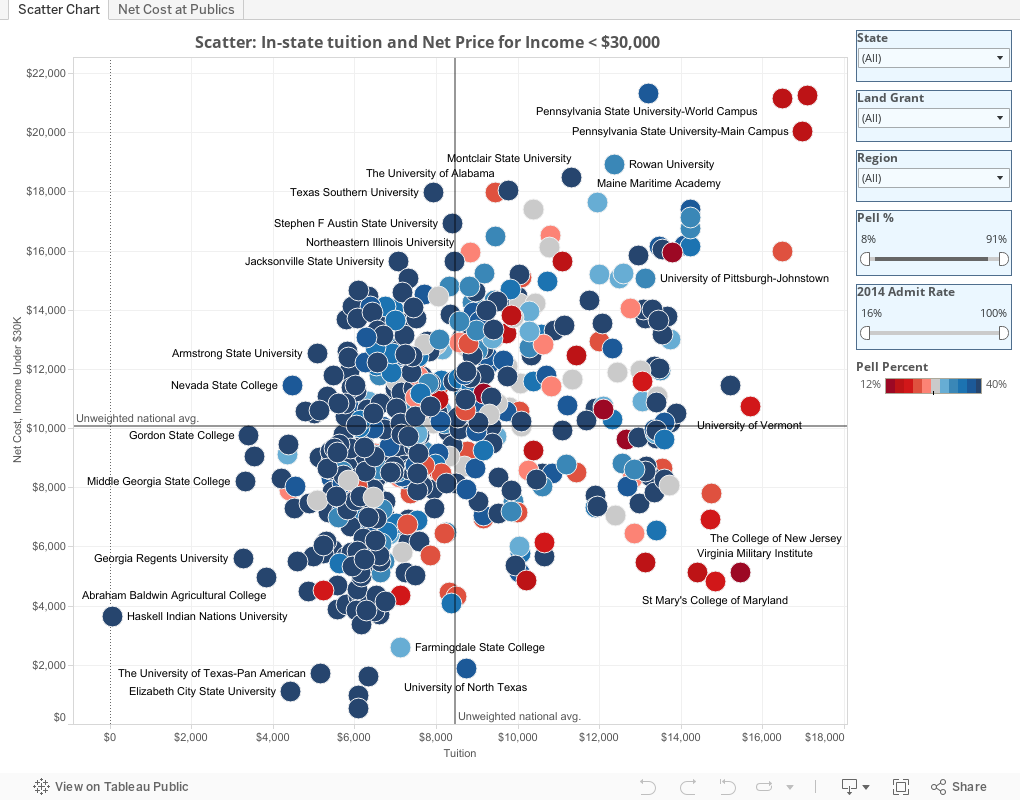
There are two views here, using the tabs across the top. The first is a scattergram, arraying almost all 660 US, four-year public colleges and universities that admit freshmen (a few are missing data). The x-axis shows in-state tuition in 2013, and the y-axis shows net price for freshman students who come from families with incomes of $30,000 or less, and who are paying the in-state tuition, most of whom are presumably in-state residents. The color shows the percentage of students enrolled who receive a federal Pell grant, a program for very-low income students.
Reference lines show the unweighted, institutional averages, which allows the creation of quadrants, roughly:
The upper right, or high tuition, high net cost
The lower right, or high tuition, low net cost
The lower left, or low tuition and low net cost
The upper left, or low tuition, high net cost
Color here is important: Red dots are those colleges with lower percentages of Pell students; blue dots show higher values, although I've capped the color range at 40%, about the national average, if you include all types of institutions. It's important because it shows how many students these institutions enroll, not just how well they do at reducing price (if they do.) In other words, it's a bit easier to do a lot to reduce cost for students if you don't do it for very many; it's harder on your budget if you enroll more.
You can limit the view to states, regions, Land Grant status, or by using the filters to show only institutions with certain admit rates or Pell percentages. As always, take a look at California. Well done, California.
The second view shows in-state tuition over time, accompanied by net price for three groups of students who receive aid. Students from:
Families with income of less than $30,000 (gold)
Families with income of $30,000 to $48,000 (orange)
Families with income of over $110,000 (the highest band reported in IPEDS). This is in blue.
The bottom chart on the second tab simply turns these numbers into an Net Cost: Tuition ratio. A value of 1.5, for instance, means that the net price is 1.5 times tuition. Note the definition of net price:
Net cost shows all costs associated with cost of attendance, minus grant aid. For example, a university may have a tuition of $5,000, but a cost of attendance of $17,000 to include housing, meals, transportation, and personal expenses. If a student receives $10,000 in grant aid, that student's net price is $7,000, which is greater than tuition alone.
As always, hover for details, and use the reset button at lower left if you get stuck.
What do you see here? What else would you like to see?
- Hallo sahabat The secret, Pada Artikel yang anda baca kali ini dengan judul
, kami telah mempersiapkan artikel ini dengan baik untuk anda baca dan ambil informasi didalamnya. mudah-mudahan isi postingan yang kami tulis ini dapat anda pahami. baiklah, selamat membaca.
Note: Visualizations are not mobile friendly. I recommend a laptop or desktop for viewing this site.
Someone asked me today about what I thought higher education's biggest challenge was, and I said college costs without thinking. And a few hours later, I still think that, with a twist: College costs for low-income students, especially at public institutions who presumably have a primary mission of educating students of all income levels in their state.
To be sure, costs are too high at private institutions, and many of the trends you'll see here are carried over and amplified in the private sector; but private colleges and universities may exist for different reasons, and that can be hard to capture in a visualization like this.
There are two views here, using the tabs across the top. The first is a scattergram, arraying almost all 660 US, four-year public colleges and universities that admit freshmen (a few are missing data). The x-axis shows in-state tuition in 2013, and the y-axis shows net price for freshman students who come from families with incomes of $30,000 or less, and who are paying the in-state tuition, most of whom are presumably in-state residents. The color shows the percentage of students enrolled who receive a federal Pell grant, a program for very-low income students.
Reference lines show the unweighted, institutional averages, which allows the creation of quadrants, roughly:
The upper right, or high tuition, high net cost
The lower right, or high tuition, low net cost
The lower left, or low tuition and low net cost
The upper left, or low tuition, high net cost
Color here is important: Red dots are those colleges with lower percentages of Pell students; blue dots show higher values, although I've capped the color range at 40%, about the national average, if you include all types of institutions. It's important because it shows how many students these institutions enroll, not just how well they do at reducing price (if they do.) In other words, it's a bit easier to do a lot to reduce cost for students if you don't do it for very many; it's harder on your budget if you enroll more.
You can limit the view to states, regions, Land Grant status, or by using the filters to show only institutions with certain admit rates or Pell percentages. As always, take a look at California. Well done, California.
The second view shows in-state tuition over time, accompanied by net price for three groups of students who receive aid. Students from:
Families with income of less than $30,000 (gold)
Families with income of $30,000 to $48,000 (orange)
Families with income of over $110,000 (the highest band reported in IPEDS). This is in blue.
The bottom chart on the second tab simply turns these numbers into an Net Cost: Tuition ratio. A value of 1.5, for instance, means that the net price is 1.5 times tuition. Note the definition of net price:
Net cost shows all costs associated with cost of attendance, minus grant aid. For example, a university may have a tuition of $5,000, but a cost of attendance of $17,000 to include housing, meals, transportation, and personal expenses. If a student receives $10,000 in grant aid, that student's net price is $7,000, which is greater than tuition alone.
As always, hover for details, and use the reset button at lower left if you get stuck.
What do you see here? What else would you like to see?
Recently, I've made a review about my new beauty regimen. If you want to read about it, check it here. Anyway, I'm on my third week using Dr. Alvin's Professional Skin Care - Maintenance Set. Within the three weeks, I've noticed that it really didn't helped me with my hormonal acne. I have this skin condition where 1 week before and 1 week after my menstruation, my face will be bombarded with pimples. It seems like the maintenance set is not helping at all because it's so mild compared to the other 2 sets (rejuvenating and clarifying). I'm kinda' worried by the fact that my pimples won't stop appearing on my face. I need to find a way to get rid of them as fast as I can because it's back to school next week. Well, I thought I was going to try again GT bleaching cream because I have lots of pimple scars but then I've realized that my All-in-1 Maintenance cream is still half full So, I've decided to buy and use Skinmate's Shark Oil and it's very affordable too for only P55.00 (small bottle).
It's been 3 days from using it and this is how my face looks like today. Hopefully they will be all gone for the next few days. I'm currently peeling off my old skin and my pores looks small today. Let's see....
June 04 2016
**update soon**
- Hallo sahabat The secret, Pada Artikel yang anda baca kali ini dengan judul
, kami telah mempersiapkan artikel ini dengan baik untuk anda baca dan ambil informasi didalamnya. mudah-mudahan isi postingan
Artikel skinmate shark oil review, yang kami tulis ini dapat anda pahami. baiklah, selamat membaca.
Recently, I've made a review about my new beauty regimen. If you want to read about it, check it here. Anyway, I'm on my third week using Dr. Alvin's Professional Skin Care - Maintenance Set. Within the three weeks, I've noticed that it really didn't helped me with my hormonal acne. I have this skin condition where 1 week before and 1 week after my menstruation, my face will be bombarded with pimples. It seems like the maintenance set is not helping at all because it's so mild compared to the other 2 sets (rejuvenating and clarifying). I'm kinda' worried by the fact that my pimples won't stop appearing on my face. I need to find a way to get rid of them as fast as I can because it's back to school next week. Well, I thought I was going to try again GT bleaching cream because I have lots of pimple scars but then I've realized that my All-in-1 Maintenance cream is still half full So, I've decided to buy and use Skinmate's Shark Oil and it's very affordable too for only P55.00 (small bottle).
It's been 3 days from using it and this is how my face looks like today. Hopefully they will be all gone for the next few days. I'm currently peeling off my old skin and my pores looks small today. Let's see....
It's been four months that I've got my dream phone. I've been eyeing this smartphone for a long time ever since it was out in the market. My first Asus phone is the Zenfone 5. The only thing I've missed about the Zenfone 5 is it's lightness because it has a slimmer battery but the downside of it is it easily runs out of battery. That's my main problem with the Zenfone 5. I was pretty contented and happy for it for a year but then in the long run it can't cope up with my heavy camera usage. My then boyfriend, who is now my best friend, introduced the Asus Zenfone Selfie to me. I was so naive that there's a phone named like that 'coz I thought the name sounds weird. So, he excitedly showed me how it looks like and he made fun of my reaction 'coz I'm an over reactor. LOL! OMG! What a lovely looking phone indeed. The pastel colors are just so enticing and I'm quite bewitched by the baby blue color because that is my favorite color. To make the long story short, It took me 1 year to save for my Asus Zenfone Selfie. Honestly, I've raised P8,000.00 only until February 2016 and come near Valentine's day 2016 and Lazada is giving away P500.00 voucher if you buy an item worth P2000.00. Time is of the essence at that time, my bestfriend supplemented the P3,000.00 deficiency because the phone is goddamn worth P10,995.00 minus the voucher from Lazada. Remember, I'm unemployed. LOL!
Just imagine me having this reaction when my bestfriend press the CHECKOUT button from the Lazada app.
I was dancing for joy the wholeday long...until....
He informed me that Lazada called informing him that the P500.00 voucher has expired or is no longer acceptable anymore. I thought I was gonna save P500.00 from the P11,000.00 so can buy a protective case from the excess.
But he said, he is still going to buy it no matter what. He knew I've waited for so long and he doesn't want to see me sad. Yep, the guy is such a sweet person. I'm so lucky!!!
Well, I've painstakingly waited for about 5 days until my Asus Zenfone Selfie arrived. He picked it up at LBC 'coz we chose to buy it using their Cash on Delivery option. By the way, if you buy in Lazada and the value of the item is worth P5000.00 above or so, they will call you by phone and make a verification if you are really serious buying the item. This is to avoid fraud on their part also. Some are just bogus buyers. Remember, if you are just a bogus buyer in Lazada, your name will be banned the next time you purchase. I'm not sure if they'll give you a warning first or not. Anyway, I've finally got it. Just imagine me with this reaction when I received my Selfie.
Now let's get down to the serious part...
The Asus Zenfone Selfie is the pioneering smartphone camera fusion which means the front and rear camera of the phone have both 13 MP full resolution and a LED flash. The other camera features are enumerated below:
The front camera has a f/2.2-aperture, 88-degree wide-angle lens.
The dual-LED Real Tone flash gives the effect of natural lighting
In the Selfie Panorama mode, you’re able to shoot selfies with an outlook of up to 140 degrees — so everything and everyone is part of your shot.
The front camera has a Manual Mode also.
The macro focusing can capture the subject as close as 6 cm (2.3 inches) plus laser auto-focusing that’s as quick as 0.2 seconds. The exceptional five prism Largan lens are transported by high-precision motor, maximizing focal depth for extreme close-ups.
The Beautification mode has a live make up presets (blush, skin smoothing and brightening, face slimming, eye enlargement). It has a unique timer also for if you want to take a Selfie without your arms getting on your way.
Burst Mode using the front and back camera (taking a couple of photos using a single prolonged touch of the shutter icon)
All other camera modes for the FRONT camera are Auto, Super Resolution, Low Light, Night Mode, HDR, Depth of Field, Filter Effects, GIF animation, Miniature, Time Rewind, Smart Remove, All Smiles and Timelapse (I've already mentioned Beautfication mode,Selfie Panorama and Manual Mode above)
Camera modes for the REAR/BACK camera are also Auto, Manual, HDR, Super Resolution, Low Light, Night Mode, Depth of Field, Filter Effects, GIF animation, Miniature, Panorama, Time Rewind, Smart Remove, All Smiles, Timelapse, Slow Motion and PanoSphere.
Super Resolution shot is up to 52MP (4x greater than a single shot)
Sample photos of Asus Zenfone Selfie using the different camera presets
Manual Mode ZenFone Selfie’s supreme simplicity turns pro whenever you want. One tap on the Manual button puts you in full control of 13 professional-grade settings. Set your own shutter speed and exposure value, manually adjust the white balance, or choose the preferred ISO level — all managed with the ZenUI’s beautiful fluidity. (source)
In Manual mode, you can choose on your own preference how you want your photo to come out.
Miniature Mode
The Miniature Mode is really just tilt-shift, and this trick makes landscape photos look like miniature models. In other words, it captures a photo of real size object and then turns it into a small-scale model.
Screenshot of Miniature Mode
Miniature Mode Sample Photo
Auto Mode Sample Photo for comparison with photo using the Miniature Mode
Miniature Mode Sample Photo 2
Miniature Mode Sample Photo 3
Effect Mode
It provides various filter effects for a creative and fun images. Effects included are Pixelize, Negative, Sepia,Edge effect, Cartoon, Pencil, Grayscale, Hue, Romantic, Vintage, Lomo. There's no need to download an app featuring these effects since it's already included in the Asus Zenfone Selfie.
Screenshot of Effect Mode
Effect Mode Sample Photo 2 (Vintage)
Effect Mode Sample Photo 2 (Hue)
Super Resolution Mode
Combines multiple shots to create incredible, detailed photo with up to 52 MP resolution. Do not move the camera yet while taking the first shot because it will again retake the photo 3x. So, 13MP x 4 takes = 52 MP in total.
Auto mode sample photo for comparison with the Super Resolution mode photo below
Super Resolution Mode sample photo - Click image to enlarge and see the difference
Super Resolution Mode sample photo 2 - Click image to enlarge
Panorama Mode (Rear Camera)
It grabs a wide panoramic view of your surroundings. You can do it either horizontally or vertically. This mode is great for taking landscapes or photos having wide view.
Me, wanting to take a photo of my cactus collection lining by my window (the icon at the center does not appear on my photo until I uploaded it here in my blog)
Depth of Field Effect
This mode captures close-up subjects giving it with a soft background. It focuses more the object from the front and creates a blur for the object behind it.
Screenshot of Depth of Field mode. The bar on the right side of the screen let you choose how blurry you want your photo's background to appear.
Depth of Field Mode - Sample Photo 1
Depth of Field Mode - Sample photo 2 - For comparison of the photo below
Using Auto mode- Notice the blur effect of the background
Low Light mode and Night mode (What's the difference?)
in Low Light mode, it enables 4x light sensitivity, That even in dark situations, you can still take photos. There is so much noise in the photo using this mode while in Night Mode, it allows a slower shutter speed to capture more light in dark scenes. Better not shake your hands using these modes. However, there's not much noise in the photo using the Night Mode.
Took a photo of my cat sleeping inside his bunk. It's located around the darker part of the house. (Auto Mode)
Low Light Mode vs. Auto Mode (photo above). Notice the digital noise from the photos by clicking the photo to enlarge it.
Night Mode vs. Low Light Mode (photo above). Notice there's less digital noise in this image (Click to enlarge)
Took a photo of Cheshire cat action figure under the dark area of the house using Auto Mode.
Low Light Mode vs. Auto Mode (photo above)
Night Mode vs. Low Light Mode (photo above)
HDR Mode (High Dynamic Range)
This mode expands the dynamic range of luminosity and grabs more details out from high-contrast or strong backlit scenes. Super HDRtechnology enables up to 4x brightness in dimly-lit situations so that the resulting images look exactly like what your eyes see. (source)
Celosia Armor Orange Flower taken using Auto Mode
Celosia flower taken by Asus Zenfone Selfie in HDR Mode - Sample Photo 1
Hibiscus flower - Sample Photo 2 (Auto Mode using Asus Zenfone Selfie)
Hibiscus flower - Sample Photo 2 (HDR Mode using Asus Zenfone Selfie)
Sliced Papaya (Auto Mode) - Sample Photo using Asus Zenfone Selfie - Indoor
Image of sliced papaya (HDR Mode - Asus Zenfone Selfie)
Time Rewind Mode
This mode automatically capture images before and after pressing the shutter button and let you capture and choose the best photos. Select from one of the photos which you think is the best by pressing the "done" icon.
Time Rewind Mode (Screenshot)
Best Photo 1 using Time Rewind Mode
Best Photo 2 using Time Rewind Mode
Panosphere Mode
This mode is exclusive to ASUS, allows you to take full spherical photos of your surrounding environment. Follow the instruction on the phone to easily shoot any scene around you. Moving the phone up, down, left and right will capture the entire surrounding landscape. Unlike the regular panorama mode, you can only take photos from left to right.
Auto Mode before using Panosphere Mode
Panosphere Mode - Sample Photo
Selfie Panorama
This mode allows you to take panoramic or wide angled images up to 140 degrees using the front camera. **Photo to be updated**
Slow Motion Mode
During this mode, your camera captures your subject with very high frame rate and plays it back in slow speed. This mode is very handy during sports, or any fast moving objects like dogs running, kids playing, or dancing.
Timelapse Mode
It records the video in a slower pace and playback in normal speed. In this mode the time appears to move faster.
It's been four months that I've got my dream phone. I've been eyeing this smartphone for a long time ever since it was out in the market. My first Asus phone is the Zenfone 5. The only thing I've missed about the Zenfone 5 is it's lightness because it has a slimmer battery but the downside of it is it easily runs out of battery. That's my main problem with the Zenfone 5. I was pretty contented and happy for it for a year but then in the long run it can't cope up with my heavy camera usage. My then boyfriend, who is now my best friend, introduced the Asus Zenfone Selfie to me. I was so naive that there's a phone named like that 'coz I thought the name sounds weird. So, he excitedly showed me how it looks like and he made fun of my reaction 'coz I'm an over reactor. LOL! OMG! What a lovely looking phone indeed. The pastel colors are just so enticing and I'm quite bewitched by the baby blue color because that is my favorite color. To make the long story short, It took me 1 year to save for my Asus Zenfone Selfie. Honestly, I've raised P8,000.00 only until February 2016 and come near Valentine's day 2016 and Lazada is giving away P500.00 voucher if you buy an item worth P2000.00. Time is of the essence at that time, my bestfriend supplemented the P3,000.00 deficiency because the phone is goddamn worth P10,995.00 minus the voucher from Lazada. Remember, I'm unemployed. LOL!
Just imagine me having this reaction when my bestfriend press the CHECKOUT button from the Lazada app.
I was dancing for joy the wholeday long...until....
He informed me that Lazada called informing him that the P500.00 voucher has expired or is no longer acceptable anymore. I thought I was gonna save P500.00 from the P11,000.00 so can buy a protective case from the excess.
But he said, he is still going to buy it no matter what. He knew I've waited for so long and he doesn't want to see me sad. Yep, the guy is such a sweet person. I'm so lucky!!!
Well, I've painstakingly waited for about 5 days until my Asus Zenfone Selfie arrived. He picked it up at LBC 'coz we chose to buy it using their Cash on Delivery option. By the way, if you buy in Lazada and the value of the item is worth P5000.00 above or so, they will call you by phone and make a verification if you are really serious buying the item. This is to avoid fraud on their part also. Some are just bogus buyers. Remember, if you are just a bogus buyer in Lazada, your name will be banned the next time you purchase. I'm not sure if they'll give you a warning first or not. Anyway, I've finally got it. Just imagine me with this reaction when I received my Selfie.
Now let's get down to the serious part...
The Asus Zenfone Selfie is the pioneering smartphone camera fusion which means the front and rear camera of the phone have both 13 MP full resolution and a LED flash. The other camera features are enumerated below:
The front camera has a f/2.2-aperture, 88-degree wide-angle lens.
The dual-LED Real Tone flash gives the effect of natural lighting
In the Selfie Panorama mode, you’re able to shoot selfies with an outlook of up to 140 degrees — so everything and everyone is part of your shot.
The front camera has a Manual Mode also.
The macro focusing can capture the subject as close as 6 cm (2.3 inches) plus laser auto-focusing that’s as quick as 0.2 seconds. The exceptional five prism Largan lens are transported by high-precision motor, maximizing focal depth for extreme close-ups.
The Beautification mode has a live make up presets (blush, skin smoothing and brightening, face slimming, eye enlargement). It has a unique timer also for if you want to take a Selfie without your arms getting on your way.
Burst Mode using the front and back camera (taking a couple of photos using a single prolonged touch of the shutter icon)
All other camera modes for the FRONT camera are Auto, Super Resolution, Low Light, Night Mode, HDR, Depth of Field, Filter Effects, GIF animation, Miniature, Time Rewind, Smart Remove, All Smiles and Timelapse (I've already mentioned Beautfication mode,Selfie Panorama and Manual Mode above)
Camera modes for the REAR/BACK camera are also Auto, Manual, HDR, Super Resolution, Low Light, Night Mode, Depth of Field, Filter Effects, GIF animation, Miniature, Panorama, Time Rewind, Smart Remove, All Smiles, Timelapse, Slow Motion and PanoSphere.
Super Resolution shot is up to 52MP (4x greater than a single shot)
Sample photos of Asus Zenfone Selfie using the different camera presets
Manual Mode ZenFone Selfie’s supreme simplicity turns pro whenever you want. One tap on the Manual button puts you in full control of 13 professional-grade settings. Set your own shutter speed and exposure value, manually adjust the white balance, or choose the preferred ISO level — all managed with the ZenUI’s beautiful fluidity. (source)
In Manual mode, you can choose on your own preference how you want your photo to come out.
Miniature Mode
The Miniature Mode is really just tilt-shift, and this trick makes landscape photos look like miniature models. In other words, it captures a photo of real size object and then turns it into a small-scale model.
Screenshot of Miniature Mode
Miniature Mode Sample Photo
Auto Mode Sample Photo for comparison with photo using the Miniature Mode
Miniature Mode Sample Photo 2
Miniature Mode Sample Photo 3
Effect Mode
It provides various filter effects for a creative and fun images. Effects included are Pixelize, Negative, Sepia,Edge effect, Cartoon, Pencil, Grayscale, Hue, Romantic, Vintage, Lomo. There's no need to download an app featuring these effects since it's already included in the Asus Zenfone Selfie.
Screenshot of Effect Mode
Effect Mode Sample Photo 2 (Vintage)
Effect Mode Sample Photo 2 (Hue)
Super Resolution Mode
Combines multiple shots to create incredible, detailed photo with up to 52 MP resolution. Do not move the camera yet while taking the first shot because it will again retake the photo 3x. So, 13MP x 4 takes = 52 MP in total.
Auto mode sample photo for comparison with the Super Resolution mode photo below
Super Resolution Mode sample photo - Click image to enlarge and see the difference
Super Resolution Mode sample photo 2 - Click image to enlarge
Panorama Mode (Rear Camera)
It grabs a wide panoramic view of your surroundings. You can do it either horizontally or vertically. This mode is great for taking landscapes or photos having wide view.
Me, wanting to take a photo of my cactus collection lining by my window (the icon at the center does not appear on my photo until I uploaded it here in my blog)
Depth of Field Effect
This mode captures close-up subjects giving it with a soft background. It focuses more the object from the front and creates a blur for the object behind it.
Screenshot of Depth of Field mode. The bar on the right side of the screen let you choose how blurry you want your photo's background to appear.
Depth of Field Mode - Sample Photo 1
Depth of Field Mode - Sample photo 2 - For comparison of the photo below
Using Auto mode- Notice the blur effect of the background
Low Light mode and Night mode (What's the difference?)
in Low Light mode, it enables 4x light sensitivity, That even in dark situations, you can still take photos. There is so much noise in the photo using this mode while in Night Mode, it allows a slower shutter speed to capture more light in dark scenes. Better not shake your hands using these modes. However, there's not much noise in the photo using the Night Mode.
Took a photo of my cat sleeping inside his bunk. It's located around the darker part of the house. (Auto Mode)
Low Light Mode vs. Auto Mode (photo above). Notice the digital noise from the photos by clicking the photo to enlarge it.
Night Mode vs. Low Light Mode (photo above). Notice there's less digital noise in this image (Click to enlarge)
Took a photo of Cheshire cat action figure under the dark area of the house using Auto Mode.
Low Light Mode vs. Auto Mode (photo above)
Night Mode vs. Low Light Mode (photo above)
HDR Mode (High Dynamic Range)
This mode expands the dynamic range of luminosity and grabs more details out from high-contrast or strong backlit scenes. Super HDRtechnology enables up to 4x brightness in dimly-lit situations so that the resulting images look exactly like what your eyes see. (source)
Celosia Armor Orange Flower taken using Auto Mode
Celosia flower taken by Asus Zenfone Selfie in HDR Mode - Sample Photo 1
Hibiscus flower - Sample Photo 2 (Auto Mode using Asus Zenfone Selfie)
Hibiscus flower - Sample Photo 2 (HDR Mode using Asus Zenfone Selfie)
Sliced Papaya (Auto Mode) - Sample Photo using Asus Zenfone Selfie - Indoor
Image of sliced papaya (HDR Mode - Asus Zenfone Selfie)
Time Rewind Mode
This mode automatically capture images before and after pressing the shutter button and let you capture and choose the best photos. Select from one of the photos which you think is the best by pressing the "done" icon.
Time Rewind Mode (Screenshot)
Best Photo 1 using Time Rewind Mode
Best Photo 2 using Time Rewind Mode
Panosphere Mode
This mode is exclusive to ASUS, allows you to take full spherical photos of your surrounding environment. Follow the instruction on the phone to easily shoot any scene around you. Moving the phone up, down, left and right will capture the entire surrounding landscape. Unlike the regular panorama mode, you can only take photos from left to right.
Auto Mode before using Panosphere Mode
Panosphere Mode - Sample Photo
Selfie Panorama
This mode allows you to take panoramic or wide angled images up to 140 degrees using the front camera. **Photo to be updated**
Slow Motion Mode
During this mode, your camera captures your subject with very high frame rate and plays it back in slow speed. This mode is very handy during sports, or any fast moving objects like dogs running, kids playing, or dancing.
Timelapse Mode
It records the video in a slower pace and playback in normal speed. In this mode the time appears to move faster.
I just want to share my photos of the week for this month of May 2016. One of my favorite hobby is to take a lot of pictures with my Asus Zenfone Selfie. This 4th week of May is obviously significant to me because it's when my 30th birthday falls. Have fun browsing!
Election day in the Philippines. My first time to vote in the National election.
My mixed siamese and persian cat hanging by the window. Outside is my father's banana plants.
My first time to attend a political rally. Duterte supporter right here and I'm ready for change in this country.
Did a quick watercolor painting for my mom's birthday using my reliable Simbalion watercolor palette.
The clear blue water is such a good idea to take underwater photos using my action camera.
Gone dog walking with my German Shepherd. We came to stop by this herd of goats but this pregnant mama goat is not amused by us. She even attempted to headbutt us for invading her territory. LOL!
Master and dog gazing somewhere. What are they thinking? Any guess?
Baby Echinocactus grusonii (Golden Barrel Cactus). Is this what they called pin cushion cactus also? Not sure though...please enlighten me on this, fellow succulent lovers by commenting below.
My new favorite chow fan mix though I prefer the steamed siomai chow fan.
Home cooked hash-browns and some overcooked squid balls getting ready to be eaten while watching Crimson Peak.
Him tying his shoelace.
Talisay leaves falling down giving us summery feels though it's already May.
Standing by this dilapidated swing. Dead leaves are being dumped at the back also in this kiddie park.
Just checking this isolated resort somewhere. Thinking we could go swimming and try their pool slides but the water in the pool is quite dirty. So, we changed our minds. LOL! Maybe next time.
I just want to share my photos of the week for this month of May 2016. One of my favorite hobby is to take a lot of pictures with my Asus Zenfone Selfie. This 4th week of May is obviously significant to me because it's when my 30th birthday falls. Have fun browsing!
Election day in the Philippines. My first time to vote in the National election.
My mixed siamese and persian cat hanging by the window. Outside is my father's banana plants.
My first time to attend a political rally. Duterte supporter right here and I'm ready for change in this country.
Did a quick watercolor painting for my mom's birthday using my reliable Simbalion watercolor palette.
The clear blue water is such a good idea to take underwater photos using my action camera.
Gone dog walking with my German Shepherd. We came to stop by this herd of goats but this pregnant mama goat is not amused by us. She even attempted to headbutt us for invading her territory. LOL!
Master and dog gazing somewhere. What are they thinking? Any guess?
Baby Echinocactus grusonii (Golden Barrel Cactus). Is this what they called pin cushion cactus also? Not sure though...please enlighten me on this, fellow succulent lovers by commenting below.
My new favorite chow fan mix though I prefer the steamed siomai chow fan.
Home cooked hash-browns and some overcooked squid balls getting ready to be eaten while watching Crimson Peak.
Him tying his shoelace.
Talisay leaves falling down giving us summery feels though it's already May.
Standing by this dilapidated swing. Dead leaves are being dumped at the back also in this kiddie park.
Just checking this isolated resort somewhere. Thinking we could go swimming and try their pool slides but the water in the pool is quite dirty. So, we changed our minds. LOL! Maybe next time.